Alistair Davidson from Petrolhead Magazine has been receiving my blog updates and asked if he could run some of them as a technical column in the magazine. Of course Al, more than happy for you to share, especially if it will help someone else have a go and do some of their hot rod build themselves.
So bear with me everyone I will go over some of the stuff I have already covered in earlier "Coupe" blogs, but hey a little refresher ain't so bad.
Often when you read a technical article they will say something like "then simply fibreglass the scoop into place". Yeah real helpful....I know I need to glass the scoop on, but how do you do that?
Well here you go, here's a step by step.
You'll recall in the last issue I glassed the scoop on from the top, but it still needs to be glassed from the underside. So I will flip the hood over and work from the underside. Firstly I sanded the edge back so I had a nice clean surface and a radiused edge which is much easier to work with than a square shoulder.
I then put down a drop sheet to catch the inevitable drops of resin as these, once set, are near impossible to remove from your driveway or garage floor.
After that, cut up heaps of Fibreglass chopped strand matting. Cut it into strips of a size that is going to fit the job you are doing. Because I am glassing a reverse curve I tend to make the strips a little narrower and a little longer. This is because the matting will always try and go back to flat when you are working with it. If you make the strips too wide it will really fight against your efforts to get it to sit flush over the curve. It will tend to lift in the middle like this.
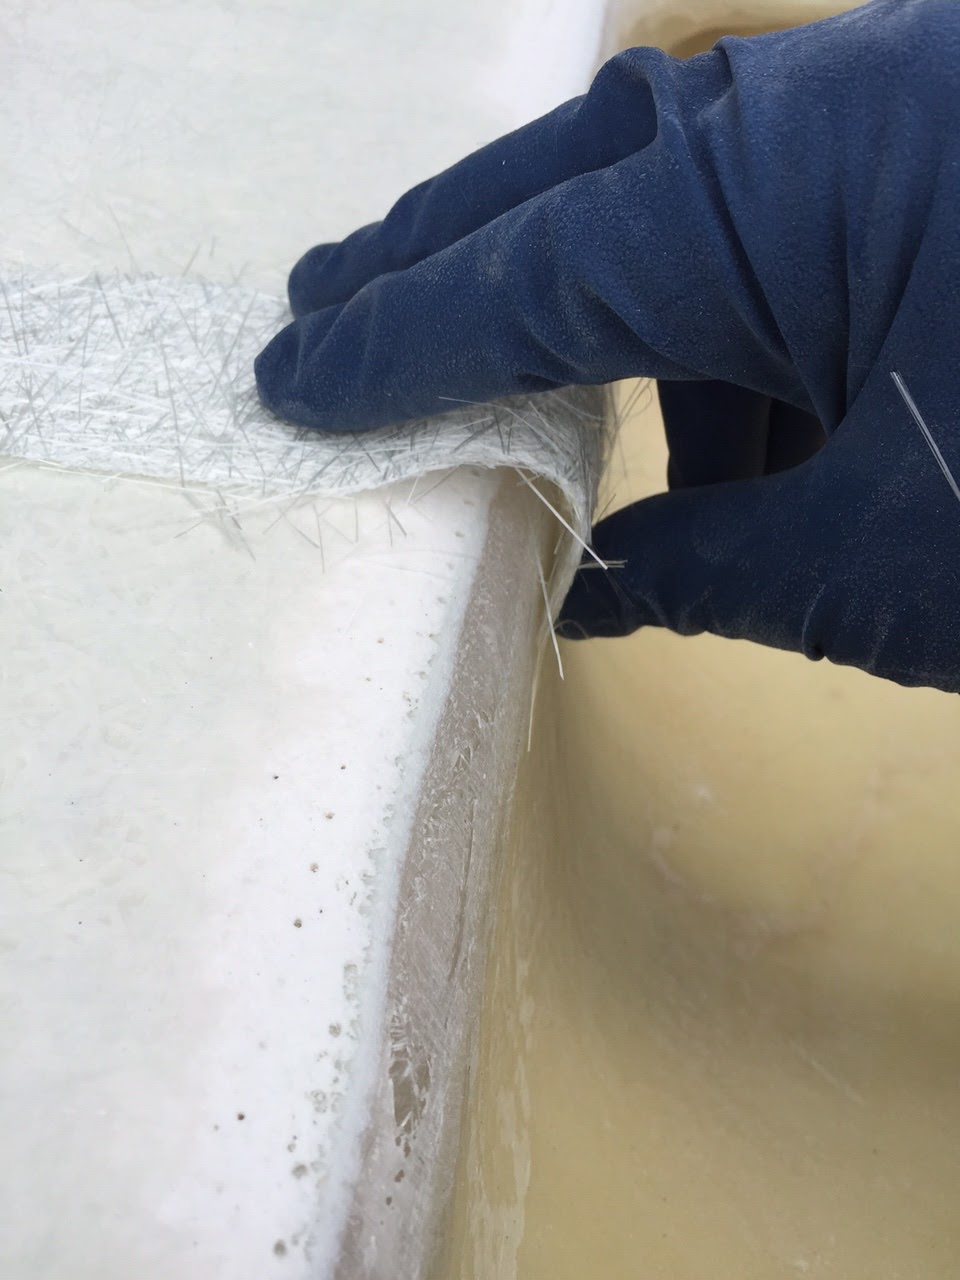
Of course though you need it to sit nice and flush like this.

Similarly if you make the strips too short, they will lift at one end, and as fast as you try and get them to stick they will pop up again like a never ending game of wack-a-mole. Just be generous with the length and the additional adhesion you get from the length will solve the problem.
Here are all my strips ready to go. I always do heaps as the last thing you want is to run out when you have resin all over your gloves, you'll just get in a mess, so do way more than you need, you can always use any left overs on another job.
I have cut long strips and will pull these apart at required lengths as I go. The matting tears easily when its cut in strips like this. This means I have a little flexibility to use longer or shorter lengths particularly when working in the corners, where you may need to vary things a bit.

Now that you have it all ready to go its time to mix up the resin. I am using polyester matting and the hood is made from polyester fibreglass also, so I will be using polyester resin as well.
There is epoxy resin/fibreglass too, and this will go onto a polyester base just fine, but never do it the other way round i.e. never use polyester resin over epoxy. It may not set properly and you run the risk of it delaminating.
Anyway lets prep some polyester resin. The most important thing here is cleanliness and to ensure you do not let any hardener get anywhere near your bulk resin. Not even a drop! It will start the chemical reaction and when you go back to your bulk resin some months later it will be buggered.
I buy mine from Car Colours on the North Shore. Ken and the crew are super helpful and are always keen to hear about what I'm up to with the projects I have on the go, so I'm always happy to flick my business their way.
At this point its important to have your safety gear on. I cover my skin by wearing disposable overalls and latex gloves, and I wear a 3M face mask.

When working with resin I have found 15 tablespoons is a good quantity and I measure this carefully. I transfer the resin to a clean Watties spaghetti can or similar, that way I am going from clean bulk resin to a clean empty can.
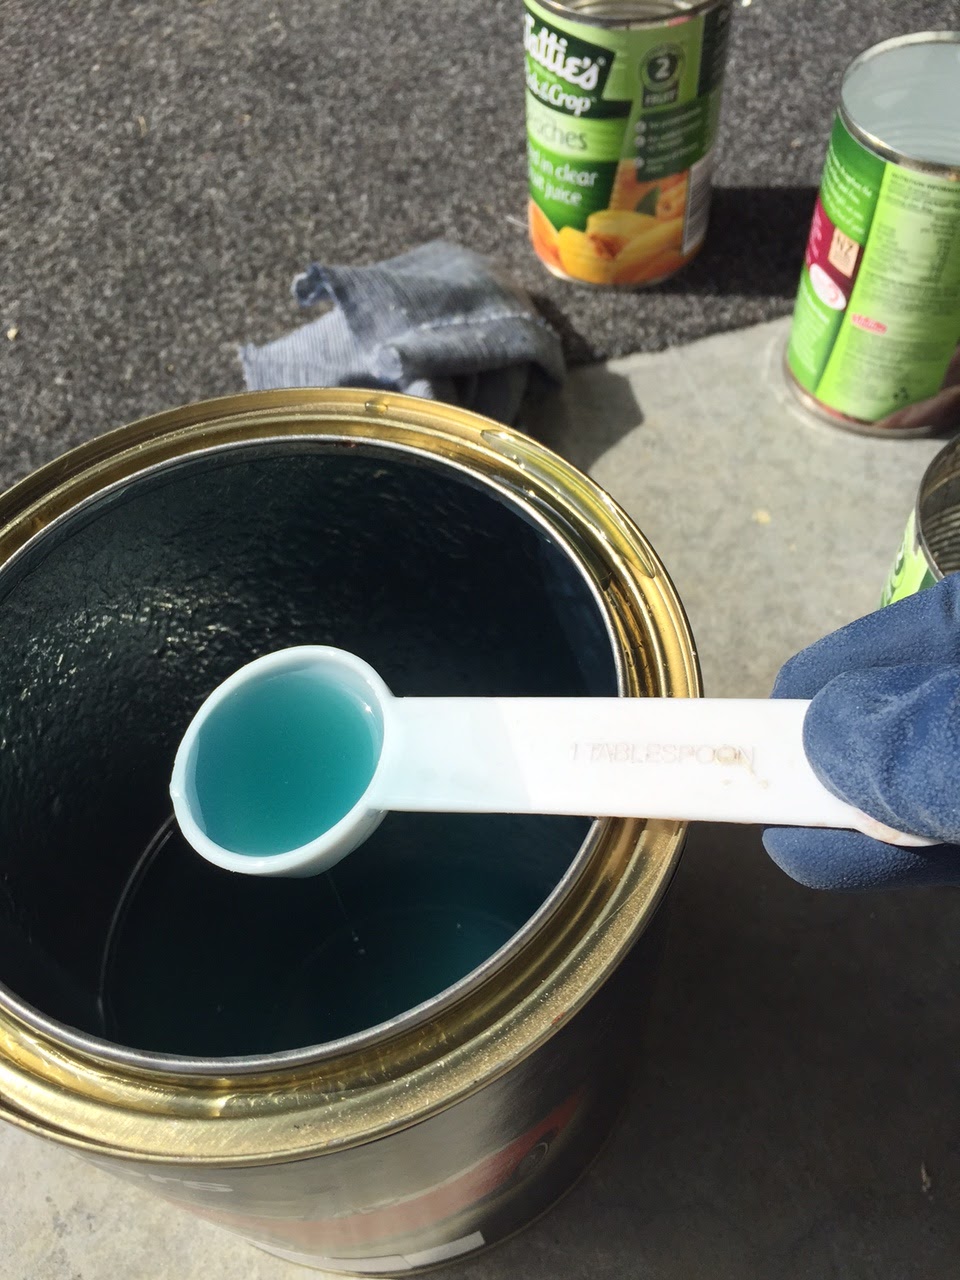
When adding the hardener I put in 3 drops per tablespoon of resin or 4 drops per tablespoon if the weather is a bit colder. This helps it set a bit quicker, so that's 45 drops in warmer weather or 60 drops if its colder.
Its the hardener that is really toxic. Treat it with the respect it deserves.

I then mix the resin thoroughly with one of those cheap arse disposable brushes you get for about a dollar from your hardware store. I'll also use the brush to apply the resin.
The resin won't set straight away so don't panic. Take your time and get it right. You wont have time to leave the job and come back to it an hour later but you needn't stress either, work with it patiently.

Firstly I'll brush some onto the area I am about to fibreglass.

Then I lay a strip in place and dab it with a the brush wet with resin.


Be generous with your resin. You really want to wet the matting. In the picture below, this is too dry. It still has whitish patches.

When its wet enough it will be quite translucent.

To help with wetting, you can use a fibreglass roller as shown below. This is a bit like floating concrete and helps to bring the resin to the surface for a nice smooth surface, it also helps to work the resin into the matting.

For this job I added 3 layers, going around the perimeter 3 times ensuring each strip overlapped the previous one. Here it is all done, just need to let it harden.

Once hardened off I started work again on the top. I sanded the rough fibreglass surface and got the general shape for the finished join. I used 80 grit sandpaper, so fairly coarse.
If you use the sandpaper by hand your fingers will follow the contours and you will be sanding the low spots and the high spots, so you end up with a wavey surface instead of a nice flat surface.
To achieve a flat surface, use a flat sanding board as you will cut through the high spots quickly with such a coarse grit and the fact its on a board means you level it out by knocking off only the high spots.

Once done I blew the dust away with compressed air then I sprayed it with prepsol to clean the surface (I have mine in a pump sprayer).

Then a quick wipe down before priming the surface.

I just used a lacquer primer in an aerosol can because it was such a small area. Already you can see the imperfections int the surface.


After a light sand I filled the low spots with body filler or bog as its often referred. Believe it or not bog is fibreglass as well, its just fibreglass powder in resin. The powder makes it more like a paste or filler.

To set the filler you need to add a hardener. Gauging 3% hardener is difficult but I work on a dollop the size of a matchbox to a 1cm strip of hardener (it squeezes out like toothpaste). Again you can add more if you want it to harden more quickly.
I then mix thoroughly by pressing the hardener into the bog. Scrape it up and press it in again. Keep doing that until the hardener is blended thoroughly i.e. no stripes of hardener, it should be an even colour.
Never stir the hardener in as you will get air bubbles and when you sand the hardened bog it will have tiny holes in it.

I use these bodyfiller spreaders but also have the household putty spreader on hand as I need to get in under the scoop snorkel and its quite a long way in under there.
The white pad is just that, its a pad of 100 sheets of paper for mixing your bog on. Just throw away the top sheet when you finish and you get a nice clean surface to mix on next time.

I'm not that good at bog, in case you cant tell from the pics. Its like icing a cake, perhaps I should get Janine to do this bit.
Because I'm not great at it, it means I tend to add more and while this means I fill all the nasties I do end up with a lot more sanding to do than is necessary, but oh well, I'll get a result of sorts anyway, it'll just take a while.


For the outside areas, I again use coarse sandpaper and a sanding board. I'll start with 80 but step down to 180 to finish it a bit.
As you know I have some difficult bits to get to, under the snorkel of the scoop. I ended up creating some homemade tools. This is 80 grit taped to a file. Worked a treat!


Then to finish I used one of these foam backed sanding pads with my round file.


Finally its sanded....and trust me it took ages, a whole afternoon in fact! I really did take my time though to get the shapes right. Its the effort you put in here that determine how good or bad it will look once complete.
Here it is, what I would refer to as finished to panelbeater level. It will still need more work by the car painter with primer fillers and fine fillers and much finer sanding. Looking good though, pretty happy with what is about a day and halfs work.


Outstanding update Colin, very informative. And congrats on your blog going into a magazine, how cool is that!!? And I'm like you are, if I can help someone then I'm all for it. Keep up the good work.
ReplyDeleteCheers Kevin....getting there slowly!
ReplyDelete